Navigating the Idealised Suite#
Once you have copied the idealised suite u-dz791, the next step is to
navigate to your copy and open it using the Rose graphical user interface
(GUI).
Step 2: Open the suite in the Rose GUI#
Running graphical applications over SSH
If you are connected to a remote system over SSH, graphical applications need X11 forwarding to display on your computer. Start an X server on your computer first (for example, XQuartz on macOS), then connect from a terminal using generic host details supplied by your service:
ssh -AY <remote-host>
Repeat the options for every additional SSH hop. The -Y option enables
trusted X11 forwarding. The -A option forwards your SSH authentication
agent and should only be used with systems you trust. A terminal integrated
into an editor such as VS Code works in the same way as any other terminal.
On the system where you will start the graphical application, run
echo "$DISPLAY". It should return a value. If it is blank, disconnect
and reconnect with X11 forwarding enabled at every hop before continuing.
rose edit &
See also
For help choosing the correct Monsoon3 service and finding the official setup guidance, see Using Monsoon3.
rose edit &
Note
You must be on the Cylc host to run rose edit. It is not
available on the compute nodes. X11 forwarding must be enabled on
every hop, including the lander and the Cylc host.
Note
“Other” means your own machine, or a system run by another institution. You provide the environment yourself. See Choosing your platform.
rose edit &
What does the rose edit & command do?
This command opens the suite in the Rose graphical user interface, allowing you to view and modify its configuration.
The
&at the end runs the GUI in the background, so your terminal remains available for other commands.
Step 3: Setting up the suite’s top-level configuration#
Once the GUI is open, you can begin configuring the suite for your specific experiment or run by navigating through the tabs on the left side of the window.
Navigate to the template variables tab to check and, if needed, change the
top-level settings required to run the idealised suite.
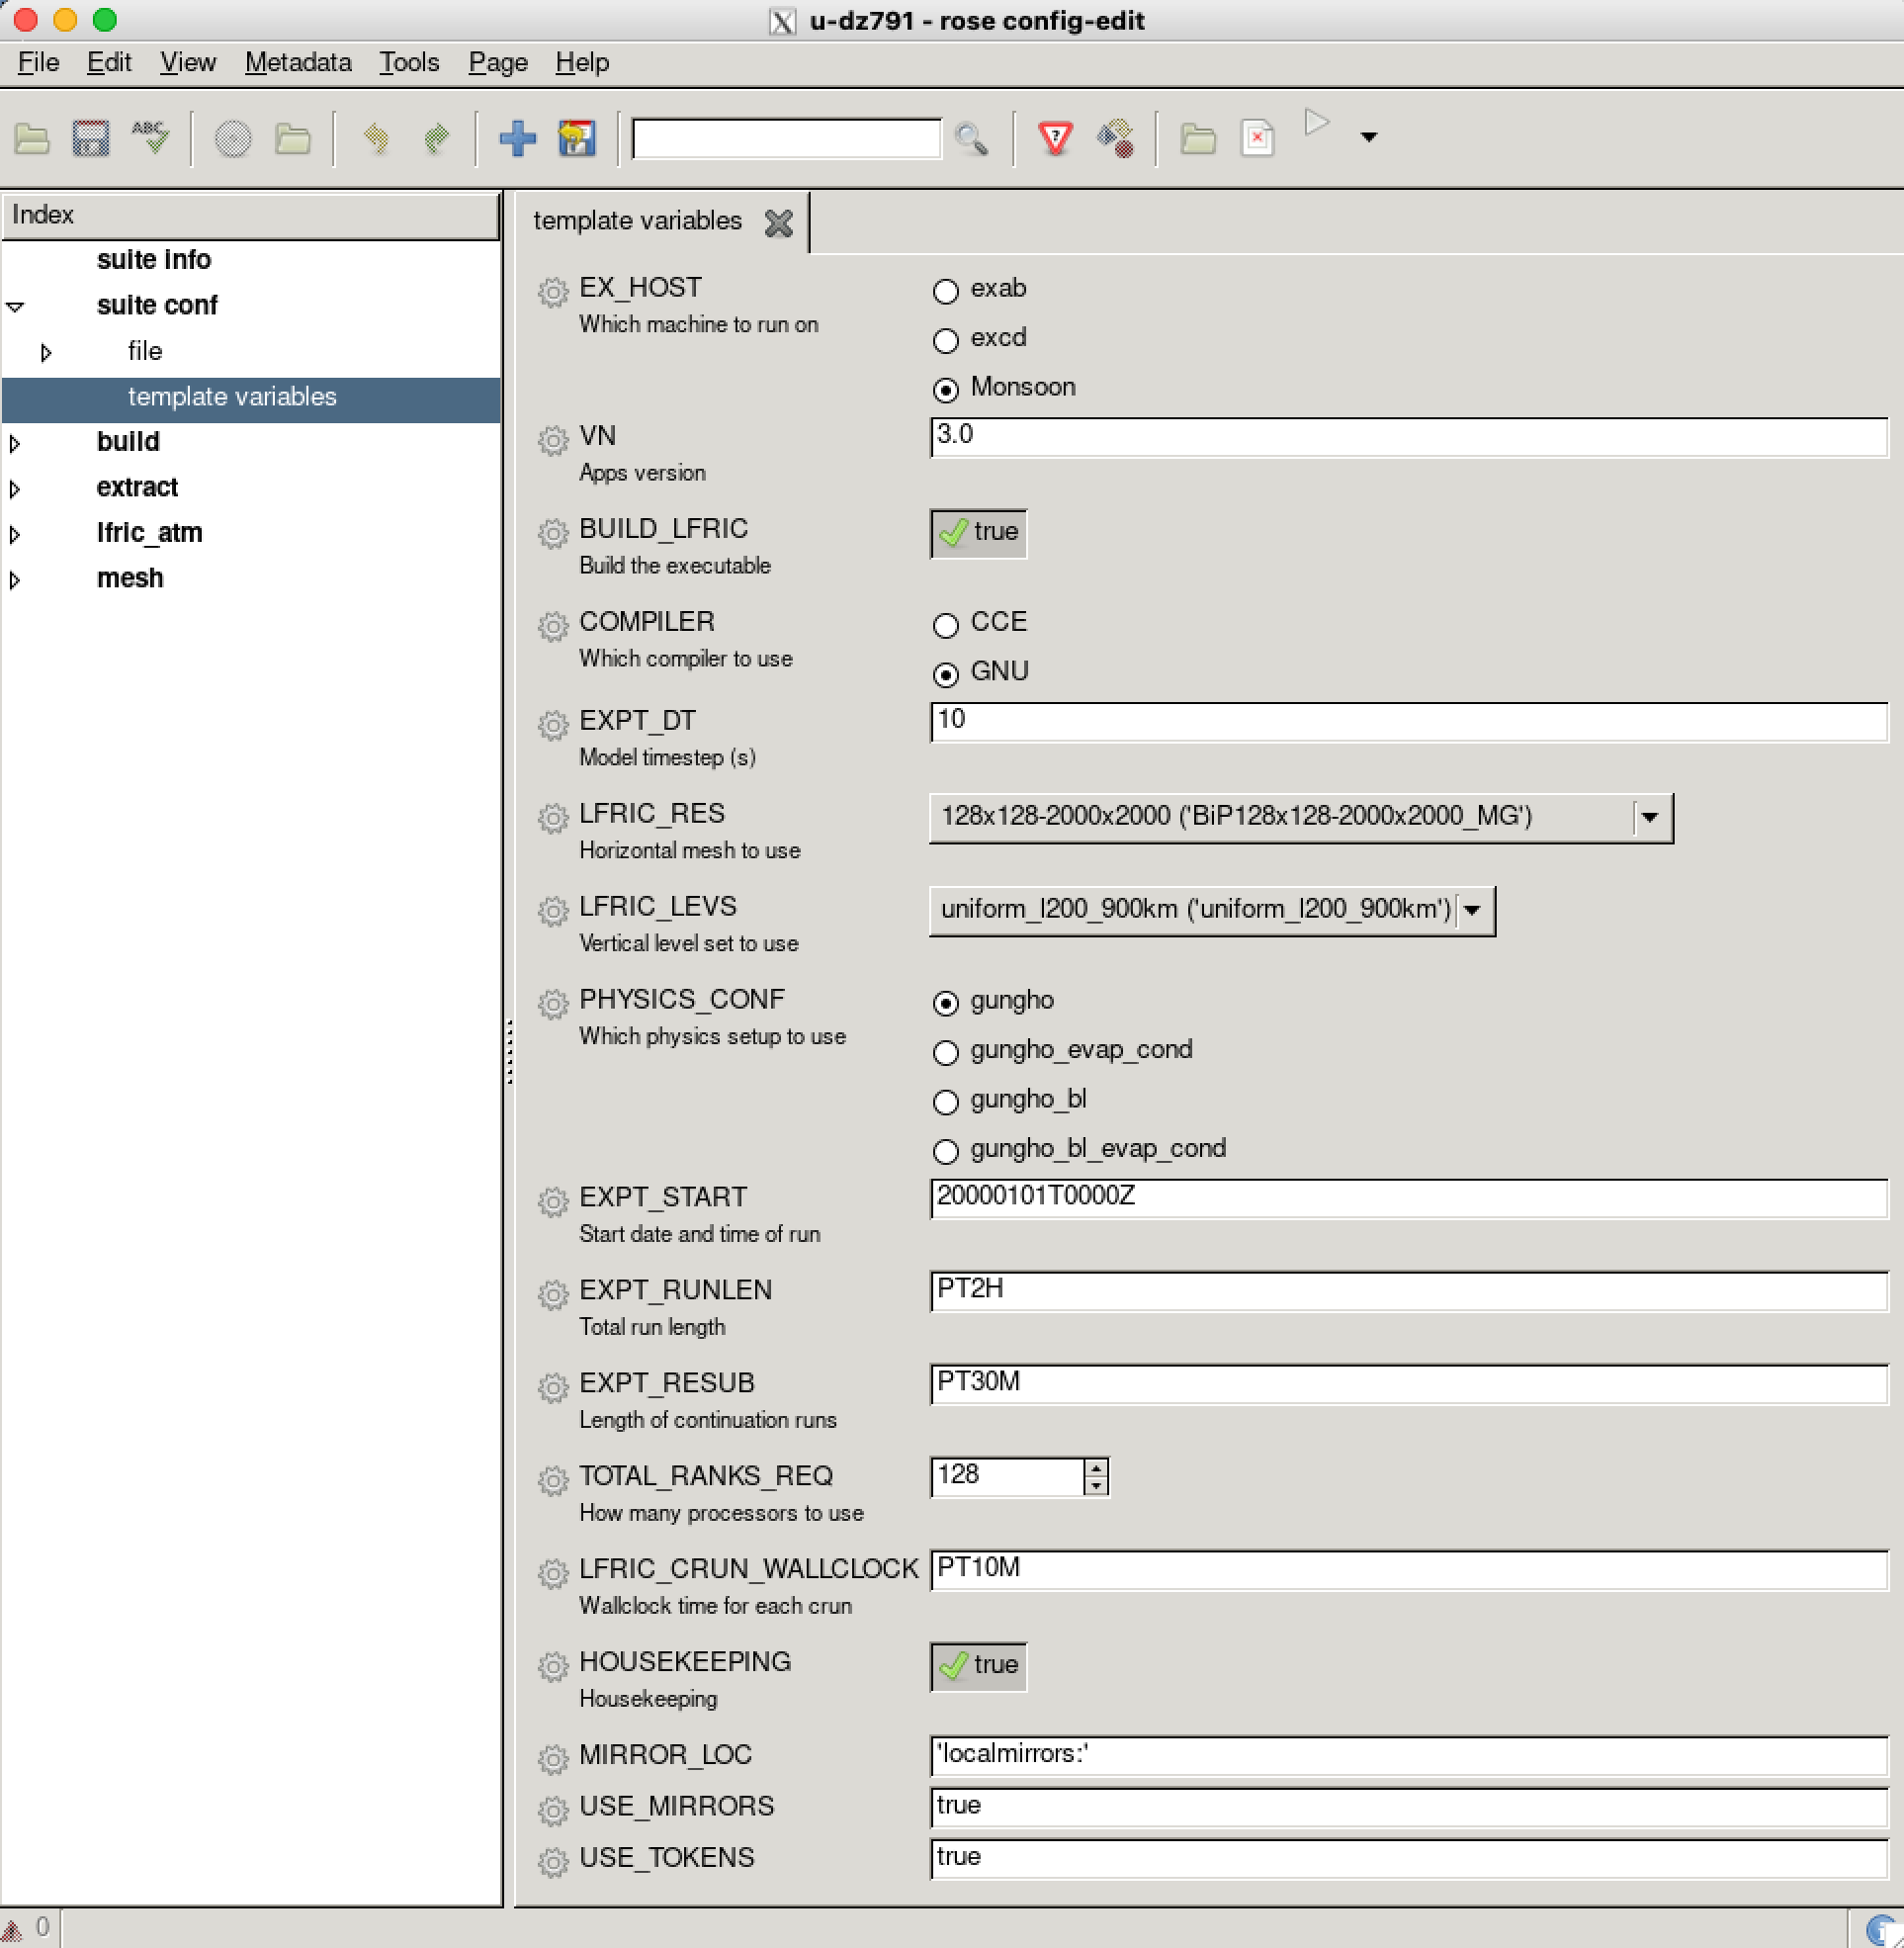
Fig. 35 Screenshot of the Rose configuration editor showing the top-level options
panel of the idealised suite u-dz791.#
Machine, LFRic version, compilation settings#
EX_HOST
Select what machine to run the experiment on. Currently only the Met Office ex1a zone or Monsoon are available.
VN
LFRic Apps version.
BUILD_LFRIC
Include compilation of the model (required for the first run).
COMPILER
Which compiler to use. Note: Cray (
CCE) is preferred as its faster than GNU.
Experiment set up#
EXPT_DT
Dynamical time step of the model in seconds. Default: 10 s.
LFRIC_RES
Select a horizontal mesh. The convention for bi-periodic Cartesian meshes is to name them as
(number of x-points)x(number of y-points)-(dx)x(dy), wheredxanddyare grid steps in the x- and y-directions, respectively. Default: 128 by 128 points with the grid spacing of 2000 m.LFRIC_LEVS
Select a vertical levels set. Default: 200 uniformly spaced levels from 0 to 900 km. Yes, km. It’s a hydrogen-dominated atmosphere, so the scale height is much larger than that for Earth’s air.
PHYSICS_CONF
Select a physical configuration. Default: GungHo-only configuration (i.e., dynamical core only).
Cycling options#
EXPT_START
Experiment start date and time. Given in a cylc time format: YYYYMMDDTHHMMZ The actual numbers are irrelevant for an idealised case.
EXPT_RUNLEN
Experiment run length in the cylc date-time format, e.g.
PT10H30M,P20D, etc.EXPT_RESUB
Experiment resubmission frequency, i.e. the length of continuation runs, in the cylc date-time format.
Parallel execution settings#
TOTAL_RANKS_REQ
Total number of processors to run the model on. Note: there are 128 per node on the ex1a machine and Monsoon.
LFRIC_CRUN_WALLCLOCK
Wallclock time to allocate to each continuation run. Given in the cylc date-time format, e.g.
PT1H. Note: the limit is 3 hours on the Met Office ex1a zone and Monsoon.HOUSEKEEPING
Clean up output directory on successful finish. Currently only removes
xios_*log files.
GitHub settings#
MIRROR_LOC
Alias for the git mirror location. Check your
~/.gitconfigwhen setting this up.USE_MIRRORS
If true, use local mirrors to clone the model’s source code. If false, clone from GitHub.
USE_TOKENS
If true, switches sources to use https URLs instead of ssh. This requires a personal access token to be setup to authenticate with GitHub.