Feature Branch Model
Last updated on 2026-06-04 | Edit this page
Estimated time: 45 minutes
Overview
Questions
- How can I use version control to collaborate with other people?
- What are Pull Request templates?
Objectives
- Use the feature branch model to collaborate.
- Clone a remote repository.
In this episode we will use the Feature Branch model to contribute to
the git-training-demo repository.
You will need to get into pairs so that you can review each others code changes. Your instructor may have already paired you with another learner.
If you are working through the material in your own time, you will be able to complete all the steps in this episode without another learner. At the end of this episode you will need to wait for a repository admin to review your work.
Cloning a Repository
You will both need to download a copy of the
git-training-demo repository. This is called “cloning a
repository”.
Make sure to navigate to the Desktop folder first.
In the Introduction to Version Control with Git and GitHub course you learnt that only certain git commands communicate between repositories.
They were:
-
git fetch: To fetch changes from a remote. -
git pull: To fetch changes from a remote and merge them into a branch. -
git push: To push changes to a remote.
git clone also communicates with a remote. However it is
only used once to make a local copy of a remote.
There are also other git commands that interact with remote
repositories (e.g. git ls-remote), but none that appear in
this course.
Feature Branches
You can now make changes to the git-training-demo
repository using your clone. We will use a feature branch to develop our
change on:
OUTPUT
Switched to branch '1_favourite_cloud'Notice the name of the branch is prefixed by the number
1. This is the Issue number of the Issue you created in
Episode 2 Issues. Your team may choose a different naming convention
such as prefixing the branch name by feature,
bug etc.
The git switch command was added in Git version
2.23. To check your version run:
If your version of Git is lower than 2.23 you should
use the git checkout command to swap branches. To create a
branch:
OUTPUT
Switched to branch '1_favourite_cloud'To swap to a branch leave out the -b flag:
OUTPUT
Switched to branch '1_favourite_cloud'Add in a new file cloud-mo-fitzroy.md, replace
mo-fitzroy with your username:
OUTPUT
# My Favourite Cloud

Light and fluffy cumulus. Add in whitespace!
To demonstrate automated testing via GitHub, add some spaces to the end of a line in your file.
Add and commit your changes:
OUTPUT
[1_favourite_cloud b7f26e6] Adds Robert Fitzroy's favourite cloud
 1 file changed, 3 insertions(+)
 create mode 100644 cloud-mo-fitzroy.md
Then push the changes to GitHub:
OUTPUT
Enumerating objects: 4, done.
Counting objects: 100% (4/4), done.
Delta compression using up to 4 threads
Compressing objects: 100% (2/2), done.
Writing objects: 100% (3/3), 357 bytes | 178.00 KiB/s, done.
Total 3 (delta 1), reused 0 (delta 0), pack-reused 0
remote: Resolving deltas: 100% (1/1), completed with 1 local object.
remote:
remote: Create a pull request for '1_favourite_cloud' on GitHub by visiting:
remote:      https://github.com/MetOffice/git-training-demo/pull/new/1_favourite_cloud
remote:
To github.com:metoffice/git-training-demo.git
 * [new branch]      1_favourite_cloud -> 1_favourite_cloud
branch '1_favourite_cloud' set up to track 'origin/1_favourite_cloud'.
Note that we didn’t have to create a remote called
origin: Git uses this name by default when we clone a
repository. This is why origin was a sensible choice in the
git-novice lesson when we were setting up remotes by hand.
Take a look at the repository on GitHub again, and you should be able
to see the 1_favourite_cloud branch. You may need to
refresh your browser to see the new branch.
If you see a message similar to the following:
OUTPUT
fatal: The current branch 1_favourite_cloud has no upstream branch.
To push the current branch and set the remote as upstream, use

    git push --set-upstream origin 1_favourite_cloud

To have this happen automatically for branches without a tracking
upstream, see 'push.autoSetupRemote' in 'git help config'.
You will need to set the name of the upstream GitHub branch using the
recommended git push command.
You can get git to automatically set the upstream branch. This avoids having to run git push with the –set-upstream flag the first time you push from a new branch.
Change your git config using:
In this episode and in the git-novice lesson, our local repository
only had a single “remote”, called origin. A remote is a
copy of the repository that is hosted somewhere else, that we can push
to and pull from, and there’s no reason that you have to work with only
one. For example, on some large projects you might have your own copy in
your own GitHub account (you’d probably call this origin)
and also the main “upstream” project repository (let’s call this
upstream for the sake of examples). You would pull from
upstream from time to time to get the latest updates that
other people have committed. We will practice using an
upstream repository later in the forking model.
Remember that the name you give to a remote only exists locally. It’s
an alias that you choose - whether origin, or
upstream, or mo-fitzroy - and not something
intrinsic to the remote repository.
The git remote family of commands is used to set up and
alter the remotes associated with a repository. Here are some of the
most useful ones:
-
git remote -vlists all the remotes that are configured (we already used this in the last episode) -
git remote add [name] [url]is used to add a new remote -
git remote remove [name]removes a remote. Note that it doesn’t affect the remote repository at all - it just removes the link to it from the local repo. -
git remote set-url [name] [newurl]changes the URL that is associated with the remote. This is useful if it has moved, e.g. to a different GitHub account, or from GitHub to a different hosting service. Or, if we made a typo when adding it! -
git remote rename [oldname] [newname]changes the local alias by which a remote is known - its name. For example, one could use this to changeupstreamtomo-fitzroy.
Open a PR
In the git-novice lesson you practised opening a pull request.
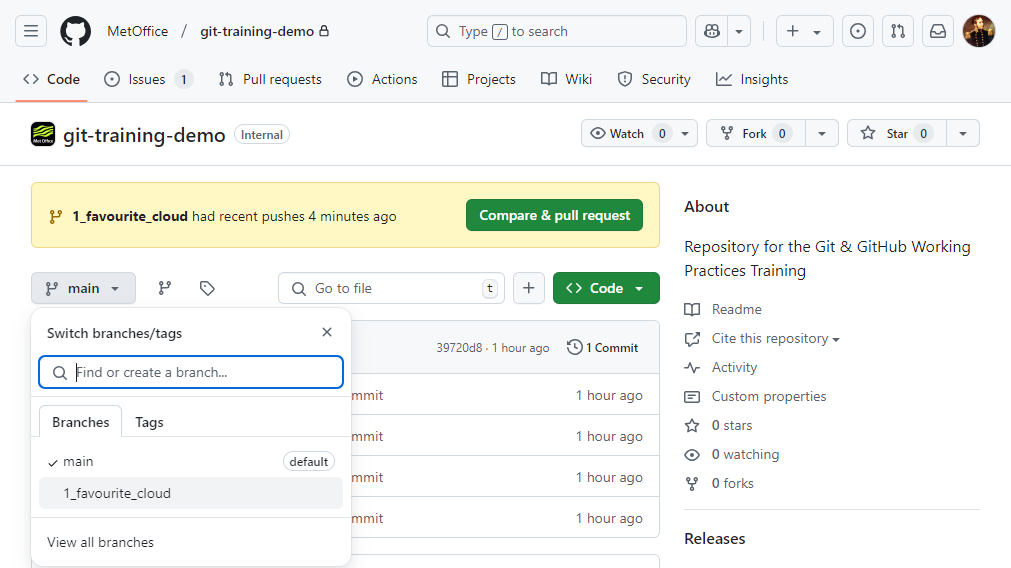
You should see a notification appear on GitHub telling you the
1_favourite_cloud branch had recent pushes. The
Collaborator should click on the green Compare & pull
request button to open the PR.
If you don’t see this notification click on the branches dropdown,
the button showing main, and click on the
1_favourite_cloud branch.
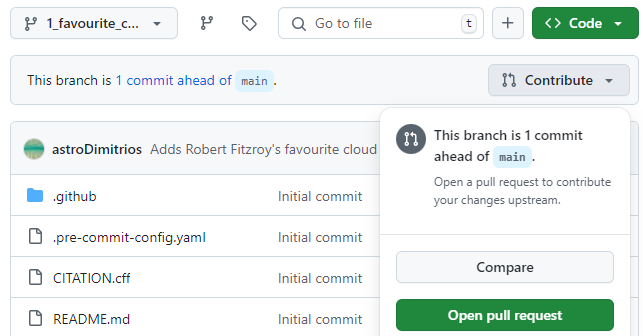
You should now see the Code view for the
1_favourite_cloud branch and a Contribute
button. Click on the Contribute button and select the
green Open pull request option.
You may have noticed when running git push on the
1_favourite_cloud branch for the first time the output
contained:
OUTPUT
remote: Create a pull request for '1_favourite_cloud' on GitHub by visiting:
remote:      https://github.com/MetOffice/git-training-demo/pull/new/1_favourite_cloud
You could have also followed this link to create a new PR. We
recommend you always open a draft PR after your first
push. This gives you access to a diff of your changes against the target
branch (usually main). When the changes are ready for
review you can mark the PR as Ready for review.
Pull Request Templates
Notice the description has filled with a template. Just like this repository used Issue templates it also uses a PR template.
This template has a checklist that needs to be completed before opening the PR1. It also has checklists for science and code review. In the description scroll down to the checklists which look like this:
Some open source projects require you to add your name to a list of
contributors. We will do this later so for now mark the task as
complete. Replace the space in the square checkbox brackets with an
x to mark the task as complete:
Now when you open the PR it should look something like this:
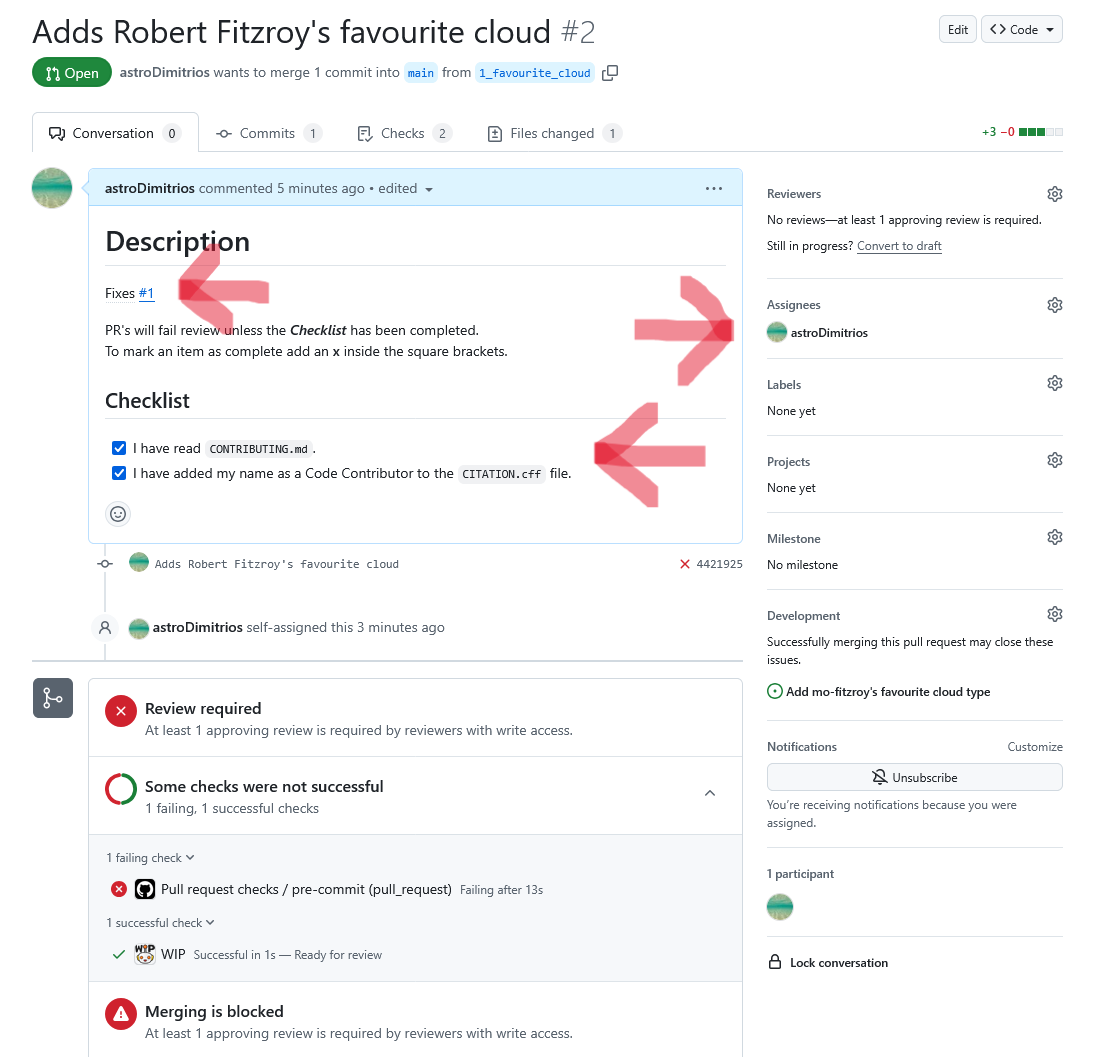
This image shows PR number #2. This PR will close/fix
Issue number #1 (the top left arrow). You can request a
review on the top right. Some repositories will be set up to
automatically assign a reviewer based on how many reviews each team
member currently has open2. The middle arrow is where you assign
yourself to the PR. The bottom arrow shows the checklist items we marked
as complete.
At the bottom of your PR you can see that a review is required before merging and some checks were not successful. This repository has automatic checks for trailing whitespace, accidentally adding large files etc. More information on setting up these checks can be found in the optional episode on pre-commit hooks.
Automatically closing Issues via PRs
A PR can automatically close an Issue when it is merged into
main. To use this GitHub functionality replace the
templates Fixes <#ISSUE_NUMBER> line with either:
or
Make sure you change 1 to your Issue number. The GitHub
Documentation has more information on linking PRs to Issues.
Fixing Failing Checks
Your changes did not pass the automatic pre-commit checks. The quickest way to check why a test failed is to click on the Pull request checks / pre-commit link near the bottom of the PR. Or you can navigate to the Checks tab in the PR, then select Pull request checks and click on the failing test.
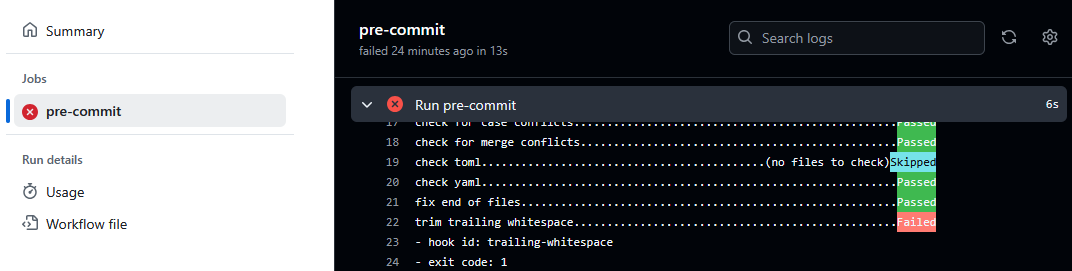
You can see in the test output trailing whitespace has been found. This caused the tests to fail. Lower down in the output you will see the filename, and a diff of the line with the whitespace.
Go back to your local repository and remove the whitespace:
OUTPUT
# My Favourite Cloud

Light and fluffy cumulus.
Add and commit your changes:
OUTPUT
[1_favourite_cloud c74c7e1] Removes whitespace
 1 file changed, 1 insertion(+), 1 deletion(-)
Push these changes to GitHub:
Navigate back to your PR. You should now see a message saying all checks have passed. Merging is still blocked until a colleague reviews our code.
In the next episode we will look at how these changes are reviewed
and merged back into main.
Assign a Reviewer
Assign the other learner in your pair as the reviewer by clicking on the cog to the right of the Reviewers section.
On the right hand side of the PR you can also:
- Assign yourself to the PR.
- Add labels to the PR.
- Add the PR to a Project by clicking on the cog next to the Projects section. (If you don’t see a project related to the training you might not have been granted permissions, ask your instructors for help)
- Assign the PR to a milestone.
- Cloning a repository gives you a local copy of the repository:
git clone <repository> <directory> - Automatically close Issues when a PR is merged by adding a
Closes #<Issue number>line to the first comment in the PR. - Pull Request templates provide template text for the first comment for new Issues of various types, and Pull Requests. They can auto-label Issues and encourage collaborators to give plenty of detail.
You can also open a draft PR and then edit the top comment to mark the checklist tasks as completed.↩︎
The GitHub Documentation has more information on automatically assigning reviewers.↩︎